Jewelry Workbench Buying Guide: Precision Essentials
By Elena Kovács • 8th Apr
Building a precision crafting workbench for jewelry requires far more than picking a flat surface and mounting a vise. A jewelry workbench that performs (one that sharpens your accuracy, protects your body, and scales with your ambition) demands a systematic approach grounded in measurement and human factors. Your posture is a spec; design the bench around it. This guide walks you through the critical dimensions, design features, and setup steps that separate a workspace that merely holds your tools from one that amplifies your precision and endurance.
Understanding the Human-First Foundation
Before evaluating specific benches, acknowledge the non-negotiable truth: a workbench is an interface between your body and your craft. Height, reach zone, stance, and daily fatigue shape the quality of work far more than decorative features or exotic wood. The bench dictates your posture for hours at a time, and poor posture corrupts both accuracy and sustainability.
A jewelry making workstation that sits at the wrong height forces you to hunch, crane your neck, or overextend your arms. These micro-compressions accumulate. After a long run of detailed work, I noticed my backache wasn't inevitable; it was the bench. Lowering the height just 30 millimeters and adding foot support transformed both my endurance and the consistency of my results. That single adjustment removed the fight between my body and the work surface, and the precision improved because I wasn't exhausted by poor positioning.
This is not incidental. Height, reach, and stance are specifications, as binding as flatness or clamp-ability.
Step 1: Establish Your Ideal Working Height
The Measurement-Backed Standard
A properly pitched jewelry workbench should sit between 90 to 100 centimeters (35 to 39 inches) in height. This is higher than a standard desk or table, and for good reason: it allows you to work in a neutral posture without hunching over small pieces or bending your elbows excessively.
This range is a starting point, not a prescription. Your actual ideal height depends on:
- Your arm length and torso proportions – taller makers often work better at the upper end of the range.
- The type of work – setting gemstones or filing delicate details may demand a slightly different height than assembly or planishing.
- Your footrest or stool setup – see Step 2.
Selecting Seating as a Co-Variable
The bench height is only half the equation. An adjustable chair is essential. If you need flexibility for standing and seated tasks, consider adjustable height workbenches that let the surface move to you. As your workbench sits higher than standard furniture, your seating must rise proportionally. Ideally, when seated, your eyes should be level with the work surface, and your elbows should bend at roughly 90 degrees.
Invest in an office chair or jeweler's stool that offers:
- Smooth height adjustment (gas cylinder, not ratcheted)
- Stable base to prevent rocking
- A seat that doesn't interfere with your leg room or foot rail
Take the time to dial in this height. Small ergonomic wins stack into big improvements in fatigue, control, and output over a full day.
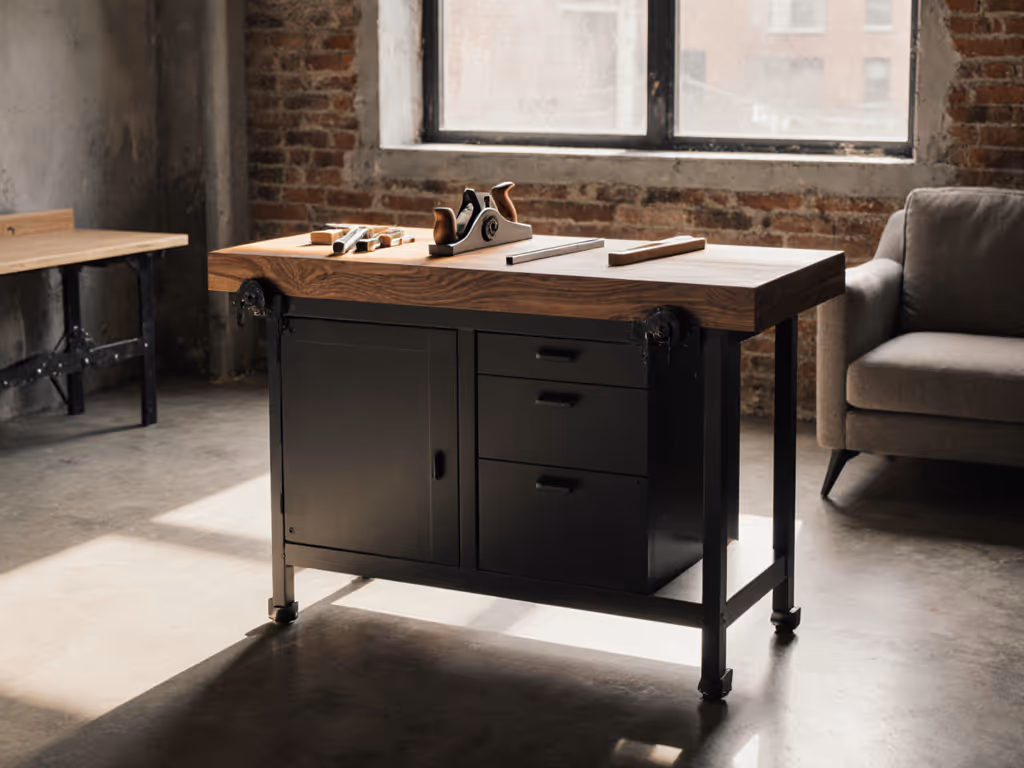
Step 2: Evaluate the Workholding Design
The Semi-Circle Cutout and Edge Lip
A production-grade jewelry workbench should feature a semi-circle cutout at the front, leaving ample open space to work on intricate projects without your body colliding with the bench edge. This cutout also lets you pull the bench closer, reducing reach and shoulder strain.
Equally critical: the lip or edge around the work surface prevents small tools, components, and findings from rolling or sliding onto your lap or the floor. For jewelry work (where a single gemstone or setting can cost more than the bench itself) this lip is not a luxury. It's a catch mechanism that preserves both tools and sanity.
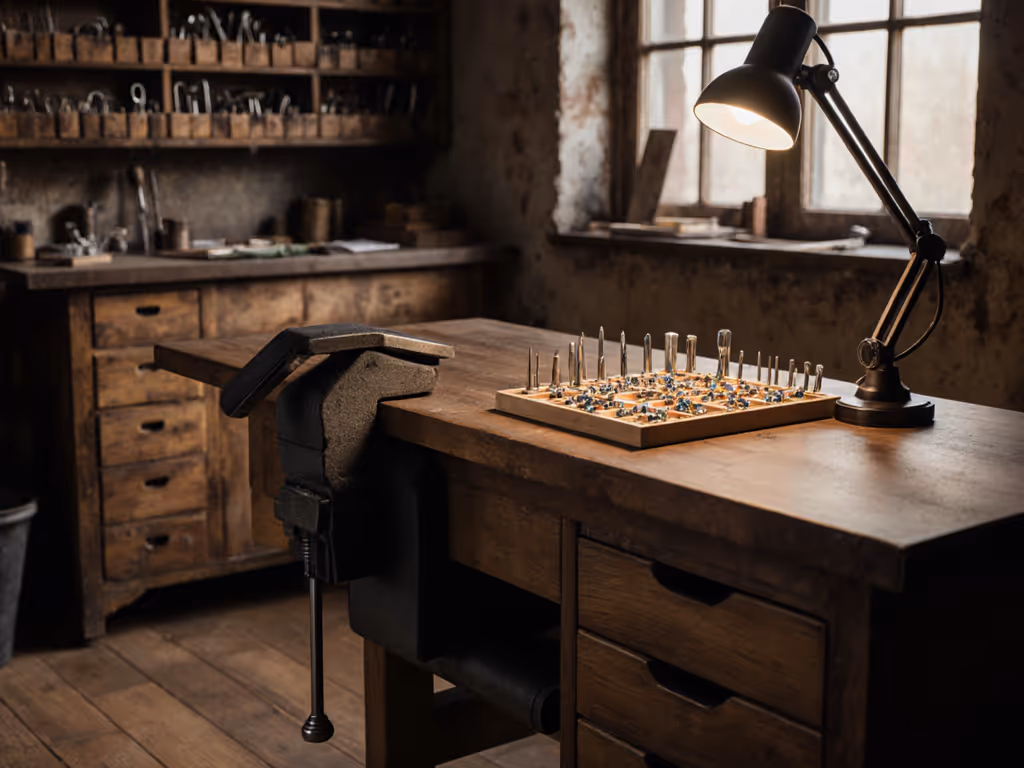
Bench Peg and Clamp Integration
A bench peg and peg clamp are vital for jewelry making beginners and professionals alike. The bench peg is a tapered wooden block secured with a G-clamp mechanism; it provides the support and leverage you need to apply pressure to your work while keeping your hands clear of the work path.
When evaluating a bench, confirm:
- The peg holes are positioned where your hands naturally reach (typically just inside the semi-circle cutout)
- Clamp rotation is smooth and doesn't foul on the frame or your legs
- You can file a small V-section into the peg to improve access and grip on the material being worked
Step 3: Specify the Work Surface Material
Anti-Static Laminated Tops for Precision
The top surface of a jewelry workbench is your interface for holding, viewing, and manipulating small components. It must accomplish multiple tasks simultaneously.
A fine detail work surface should feature a specially laminated, colored anti-static material. This material serves three functions:
- Dampens bounce: When you drop a small piece or setting, the laminated surface absorbs the impact instead of letting it bounce or scatter across the bench.
- Improves visibility: A consistent, mid-tone colored surface (often gray or tan) provides contrast for viewing tiny gemstones, wire, and settings, reducing eye strain.
- Prevents electrostatic discharge: Anti-static properties protect sensitive electronic components or delicate gemstones that can be damaged by static sparks.
The working surface should be at least 25 millimeters thick to ensure structural rigidity under file pressure, hammering, or clamping force. For techniques that demand extreme steadiness (watch repair, fine stone setting), see our micro-precision workbench setup for vibration control and lighting tips.
Step 4: Assess Storage and Organization Features
Drawer Layout and Accessibility
Organization directly impacts workflow. A jewelry making workstation that requires you to hunt for tools interrupts focus and introduces reaching that fatigues the shoulder.
Look for benches that offer:
- Multiple drawer sizes: Frequently used tools (files, tweezers, jewelers' saws) should sit within arm's reach in shallow, open drawers. Rarely used or delicate equipment can live in deeper, lockable compartments.
- Metal-lined catch drawer: At minimum, a metal-lined bottom drawer that pulls out fully for collecting metal shavings and filings. Jewelry scraps have resale value; this drawer makes collection and segregation routine.
- Customizable dividers: Adjustable or modular drawer inserts let you right-size compartments as your tool collection grows.
Accessory Mounting Options
Desktop holders, magnetic wall-mounted holders, and caddies for pliers, tweezers, needle files, and flex-shaft accessories extend your storage without consuming bench real estate. Confirm your bench design accommodates mounting rails, wall brackets, or pegboard placement nearby.
Step 5: Choose Your Bench Peg Configuration
Positioning for Intuitive Reach
Where you mount your bench peg and clamp dictates your arm angle during the majority of filing, setting, and forming work. Most gem setting workbenches position the peg hole roughly 30 to 40 centimeters from the left edge of the cutout (or to the right, if you're left-handed), at a height that lets your wrist remain neutral as you file downward. Left-handed makers can optimize peg and vise orientation with our left-handed workbench guide to reduce reach and strain.
The V-Section Detail
A small V-notch filed into the top of the peg improves both access and security. The V-groove seats the material being worked at a predictable angle, reducing slippage and freeing one hand for filing or using a setting punch. This micro-feature transforms the peg from a passive hold into an active workholding tool.
Step 6: Consider Material Quality and Durability
Hardwood Construction and Sound Dampening
The best jewelry workbenches are made entirely or almost entirely of solid hardwood. Hardwood benches offer superior stiffness, sound dampening (reducing vibration and noise transmission in shared spaces), and the ability to absorb shock from hammering or chisel work without fracturing or warping. If you're working in an apartment or shared studio, our vibration damping workbench guide shows proven ways to cut noise transfer.
Softwood or plywood benches often flex under clamp pressure, introduce unwanted vibration, and degrade quickly under the acid and solvent exposure common in jewelry studios.
Resistance to Workshop Contamination
Jewelry benches often encounter pickle acids, flux residues, polishing compounds, and solvents. Confirm your bench top is finished or sealed to resist staining and surface damage. The work surface should be serviceable: if the top layer degrades, you should be able to sand it back or replace a laminate layer without rebuilding the entire bench.
Step 7: Evaluate Clamping and Workholding Capacity
Bench Pin Hole Spacing and Grid
Some premium benches include integrated dog holes or a grid of bench-pin holes to accept multiple clamping configurations. This modular approach lets you position your peg exactly where a given task demands, rather than forcing every job into one fixed location.
Confirm:
- Hole spacing is standard (typically 100 to 150 mm apart) and clearly marked
- Clamps or pegs fit snugly without wobble
- The holes don't weaken the top or create stress risers
Step 8: Assess Growth Potential and Upgrade Pathways
Scalability and Accessory Compatibility
A precision crafting workbench should be a long-term investment, not a disposable starter. Look for designs that support staged upgrades (additional clamping hardware, supplemental drawers, adjustable feet for leveling, or lockable compartments) as your practice evolves.
Benches with standardized hole grids and T-track channels offer broad ecosystem support, meaning new tools and fixtures continue to fit logically without modification. Models designed for ergonomic enhancements and ample customizable storage prove more adaptable as your techniques and projects mature.
Step 9: Set Your Budget and Prioritize
Cost Tiers and Value Alignment
Quality jewelry benches typically fall into these ranges:
- Entry-level benches: £200 to 400 ($250 to 500 USD). Basic frame and top, single or double drawer, minimal customization. Suitable for hobbyists or students; expect limited upgrade pathways and faster wear.
- Mid-range benches: £400 to 550 ($500 to 700 USD). Solid hardwood, multiple drawer sizes, better top materials, modest clamping options. This tier often delivers the strongest value-to-durability ratio for serious makers.
- Professional-grade benches: £550 to 800+ ($700 to 1000+ USD). Hardwood construction, multiple clamping solutions, lockable storage, refined finishes, and clear upgrade paths. Justified for full-time practitioners or high-value work.
Resist the temptation to buy more drawers and features than you need now. A solid mid-range bench with a solid top, correct height, and good workholding will serve you better in five years than an ornate bargain bench that wobbles or warps.
Step 10: Plan Your Setup and First Adjustments
Assembly and Initial Leveling
Upon delivery, assemble the bench on a level floor. Use a machinist's level or straightedge to confirm the work surface is flat. If necessary, shim the feet with thin steel plates or adjustable feet to bring the top into plane.
Mount your bench peg and clamp, then perform a test grip: secure a scrap of brass or a jeweler's mandrel and apply moderate downward pressure. The assembly should feel solid, with no rocking, creeping, or creaking. If you sense movement, tighten all fasteners and re-test. For heavy handwork, also consider simple anchoring methods to eliminate any remaining creep.
Organizing Your Reach Zones
Before filling every drawer, map your typical workflow. Tools you reach for most frequently (files, pliers, tweezers) belong in the nearest drawer or on a wall-mounted caddy. Finishing supplies, mandrels, and specialized clamps can live deeper in storage. This human-first layout minimizes the hand travel and mental search that drain focus and energy.
Seating Fine-Tuning
Adjust your chair so your eyes land at the work surface when in a neutral seated posture. Your forearms should extend comfortably to the edge of the peg area without hunching your shoulders. Take a full day of work and note any spots of fatigue. Minor adjustments to chair height or depth often resolve them.
Actionable Next Steps
- Measure your current workspace: Record the floor space, ceiling height, and existing furniture. Confirm a 90 to 100 cm bench will fit without forcing you to crouch or reach awkwardly for adjacent storage.
- Define your primary work: Are you setting stones, fabricating components, or finishing? Your bench requirements shift slightly depending on whether hammering, filing, or assembly dominates your workflow.
- List your non-negotiables: Height tolerance, drawer configuration, surface material, clamping capacity, and budget tier. Use this to screen models before detailed comparisons.
- Request a demo or trial: If possible, visit a maker's studio or supplier and sit at a candidate bench under typical work conditions. Spend 30 minutes on a mock task. Your body will tell you if the height, reach, and seating harmony are genuine or a marketing claim.
- Invest in the correct chair first: Don't wait for the bench to arrive. Source your seating now so you can dial in the combined system before your first project. A $150 adjustable stool that lands you at eye level is worth ten times what a free undersized seat costs in fatigue and inaccuracy.
- Plan a modular accessory budget: Rather than buying all bells and whistles at purchase, allocate funds for clamping hardware, drawer dividers, and wall storage over the first three months. This staged approach spreads cost, refines your needs based on real use, and ensures every addition serves a proven pain point.
A jewelry workbench is not a static tool; it is a long-term partner in your precision work. Invest the time to specify it correctly, and it will repay you with years of comfortable, accurate, controlled craftsmanship.
Related Articles